
Level Up Your Game - 8 Best Practices For Unity Programmers
- Gabriel A. Pereira

- 7 de nov. de 2022
- 11 min de leitura
Atualizado: 5 de mai. de 2023

For the last four years I’ve been learning game design with Unity and, throughout my short journey, I kept trying to improve the way I write code and outline a project’s architecture. Even now, I’m always looking for new ways to simplify things, while making sure my projects are consistent and scalable. Therefore, I’ve decided to write this article, so I can share with other programmers and game designers what I’ve learned so far, based on projects I’ve been directly involved with.
Of course, when you are working on a small-scale project you want to use as many shortcuts as possible to save time. If you’re just trying to make a game in two days for a game jam or put together a small prototype, you will need to iterate as fast as possible and make sure you are on time with the deadline. But you must always keep this question in mind: what if one day you realise your project has more potential and want to expand it… is its foundation solid or will it break with the slightest addition, forcing you to start from scratch?
When I started to program in C# I would be satisfied with anything that worked and translated the mechanics I had in mind into gameplay. But as I kept learning through tutorials, open-source projects and reading articles that tackled the best coding practices, I kept adapting my methodology for writing code and laying out a game’s architecture. While project structure doesn’t really matter for the final user (aka, the player), because the only thing they will see are graphics, for a programmer or game designer it is especially important to keep things cohesive and modular, either if they are a solo developer or working on a team.
You must remember that, as you keep adding functionality to your game and your scripts grow in length, it is more likely that something will break; that is always part of the process. But if you keep a good plan from the start, things will get more manageable further down the line when you need to fix something, and your future self – who is working under pressure to finish the game, will thank your past self – who was just getting started typing the first lines of code.
I will leave here some of the practices I consider the best for writing scalable, clean and easy-to-read code, but these are mere suggestions and should not be interpreted as pages of a rulebook. Also, there are many more that could be added, but to keep things short I’ve handpicked eight priority points that came to my mind based on my analysis of the common practices and decisions many young programmers tend to adopt. Whether you’ll take these suggestions into account or not, when developing your own projects, will always depend on the type of game you want to make, your level of expertise, or simply a matter of preference. It is also worth noting this article is not meant to teach you core concepts about the Unity engine or C# code, and was mainly tailored with intermediate users in mind, as it assumes you’re already familiar with most of the engine’s main components and processes. However, don’t be afraid if you are just getting started with game design in Unity and don’t understand a few of the topics mentioned here. Maybe this article can serve as your introduction to those topics, and you can always search for more information about them. To make things easier, I’ve tried to compile as many links as possible, so nobody feels lost while reading through. Those links can be found either by clicking on a specific, underlined term, or at the end of the article in the “Related Links” section.
Note: Each topic is named after a bad practice and will present you with solutions to overcome it.
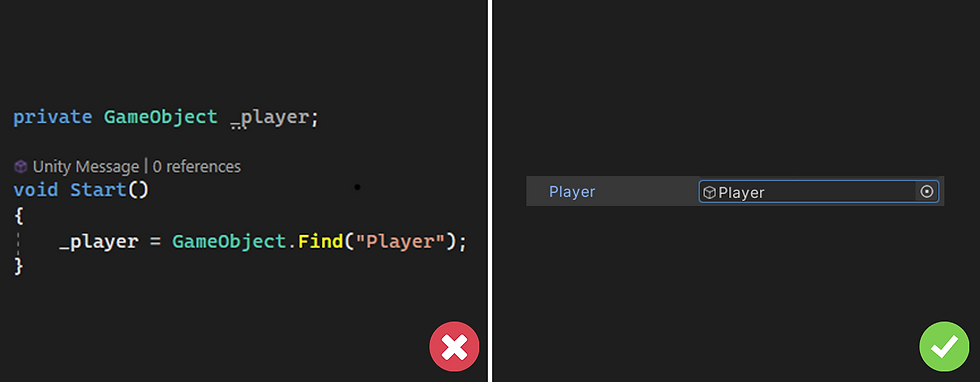
1. Searching for objects at runtime
If you’ve never put your keys or wallet somewhere you don’t remember, you either suffer from severe obsessive compulsive disorder, or have never left the house. But if you did, I’m sure you know how stressing it can be not being able to find something you really need in that moment. Well, your code doesn’t like that either.
When developing a game in Unity, you need ways to communicate between multiple components so things can actually play out. If you’re too sure about where a certain component will be when the game is running, you’ll surely use the good old GameObject.Find method, where you tell your code to look for the object that has the exact same name you feed as an argument. But what if, at some point in development, you rename your object to something else? A big red error pops up in the console!
I can never say this enough times: if you know where something is, then create a variable to reference it directly in the inspector. As long as you don’t delete the object from the scene, scripts with a direct reference will always be able to access it, no matter if you change its name or tag.
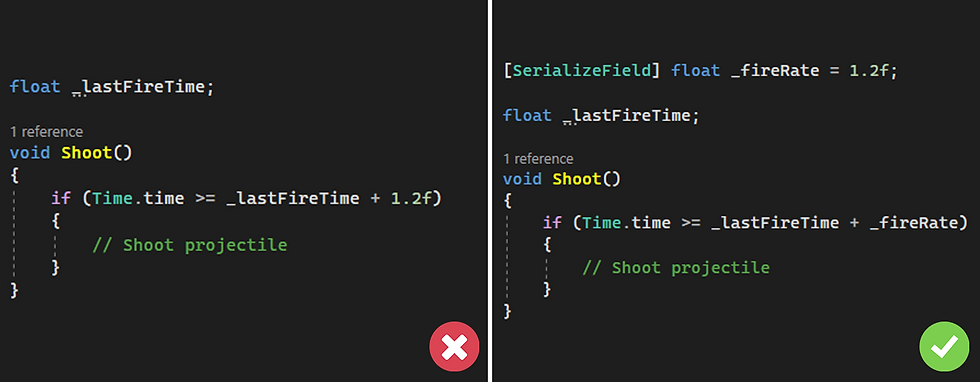
2. Hardcoding values
Hardcoded values might be a time saver (or a lazy excuse) for the programmer, but they become the game designer’s nightmare. And if you’re a solo developer, you’ll find the problem to be something in between the two. Either if you are working alone or in a team, you should avoid hardcoded values at any cost. Since game design is all about trial and error, neither you or your team will want to constantly have to open up a script and scour through multiple lines of code to find a specific value that needs to be readjusted. Therefore, you must always simplify the process by using variables that can be easily adjusted through the inspector, instead of resorting to random values you assume will get the job done.
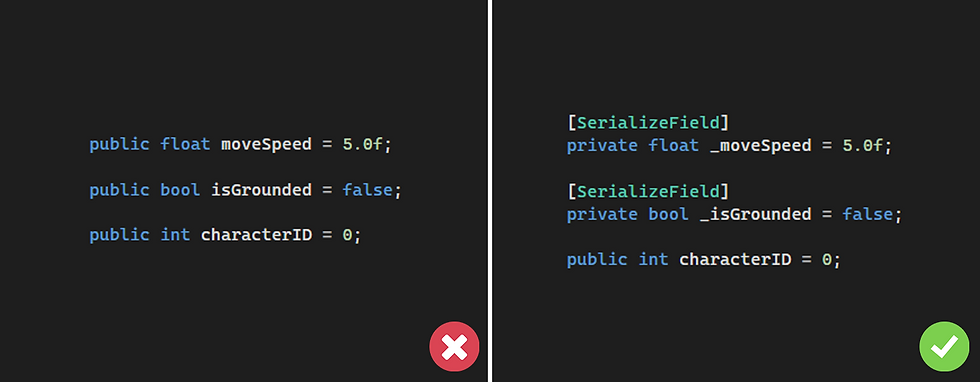
3. Making every variable public
The Unity inspector is a very powerful utility that lets you adjust values and establish relationships between objects and components without necessarily having to code them. But that doesn’t mean every variable we want to expose needs to be public. Making every variable public will allow other scripts to modify them, and that is not desirable most of the time. Imagine you have a component with a public variable to access a character’s health from a different script but, by accident, instead of reading the value you actually set it to something different. You won’t even notice the issue until you get to test your game and realise the character gains health out of the blue. Would you be able to find the culprit at that point?
The best workaround for this is to determine from the start which variables we want to allow other scripts to change, and which ones can only be directly manipulated by the script they belong to. By default, the Unity inspector only displays public variables, but if you use the SerializeField attribute before private variables they will appear as well, allowing you to directly assign or modify their values, while still keeping them inaccessible to external scripts.
As a bonus tip, if you want to expose a variable as read-only, you can define it as a getter property. This allows other scripts to access it for reading, but they will never be able to modify its value. If you think the getter definition is too long or confusing, you can always opt for the shorthand version by using the lambda symbol. This way you can, for instance, let other scripts read your character’s health value, but exclusively allow the Character component to manage it. The audacity!

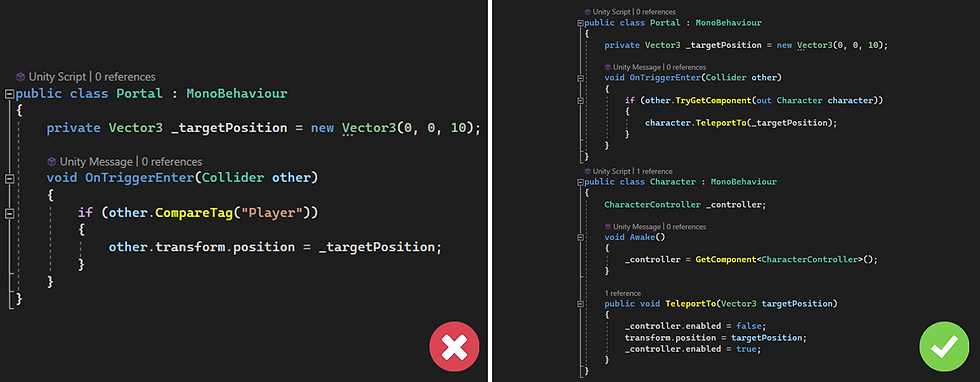
4. Manipulating other instances' components and values
Carrying on from the previous point, it is important to layout your scripts communication in a way that avoids having multiple components messing around with the same values. You should always define a hierarchy between your scripts, deciding which one does what. If, on the other hand, you opt for a structure where Script A changes the position of Object X, but then Script B does the same, you end up with entangled connections that make your code architecture very unreliable.
For instance, if you want to change the position of a character, don’t do it by accessing its transform through other scripts. Instead, create a public method inside the Character class for that purpose and then call it externally, while passing the target position as an argument. That way, characters will handle the teleport logic themselves, including taking care of any subsequent actions that might be relevant for the process, and don't have that being randomly handled by external components.
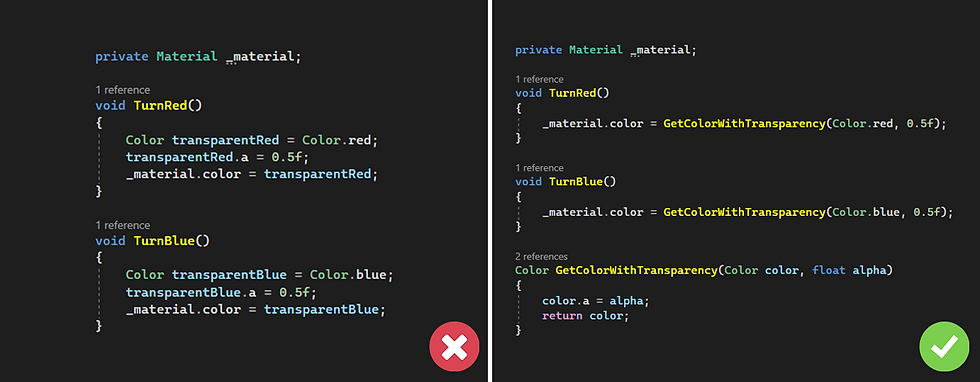
5. Repeating logic in the same script
Sometimes, a script requires calling the same logic more than once in different sections. You might have a very long and complex formula, or simply two lines of code. So, what will you do if you want to reuse it? Well, you’ll copy and paste it over and over, right? Wrong! If you’re doing that, you should stop right now.
Imagine you do copy and paste your formula, but then comes a point where you realise you want it to do more, therefore it needs to be refactored. You get the point, right? You will need to copy and paste the updated version all over again. On the other hand, you can simply isolate that magical formula inside a method and call that method as many times as necessary. This way, you will never have to bother going over every section of the script where it is being used if you decide to update it.
There is a saying among programmers which states that if you’re repeating the same line of code inside a script, you’re surely doing something wrong.
6. Not using standard naming conventions
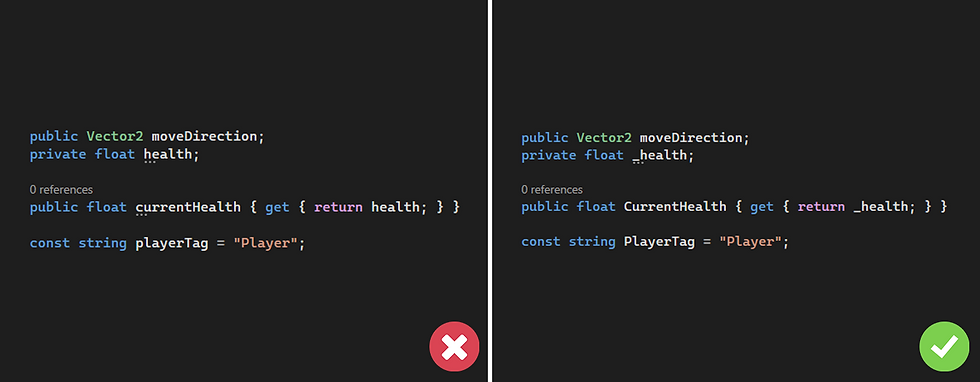
Although you’re free to name variables and methods whatever you want, since it does not affect the way your game will behave, it is recommended you review some of the main naming conventions for the programming language you’re working with. That way, you will be able to distinguish between public and private variables, for instance, without having to scroll back to the top of your script where they are being declared. This will also make your code fit within universal industry standards, while allowing other programmers to read through it without struggling to understand what's going on.
The fundamental conventions define that every public variable should be camel case (moveDirection), every private variable should be prefixed by an underscore (_currentHealth) and every property and constant should be pascal case (PlayerHealth).
Since programmers spend around 60 percent of their time reading code, it is important that they can use these small shortcuts to help them remember the nature of the variables being used. By applying these conventions, you will know that a pascal case variable can be accessed but not changed through external scripts, camel case variables are always exposed to read and write to, and variables prefixed with an underscore are unique to the script that defines them. You can check out the standard C# naming conventions here.
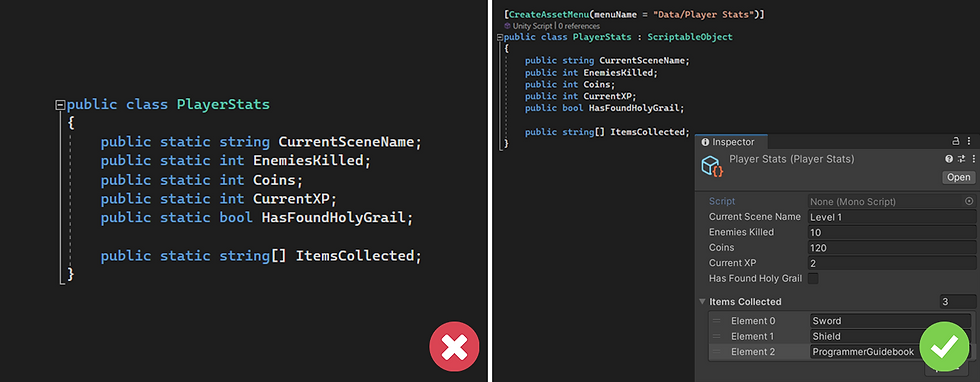
7. Storing persistent game data in static classes
Many programmers use dedicated classes to store data that must persist throughout scenes, as a way to keep track of player progress. This is effective, because those variables can be accessed by any component without an instance reference (as long as they are marked as static). The downside is that it is not easy to debug what is happening behind the curtain, since there is no way to directly visualize the values the class contains.
One great alternative is to use ScriptableObjects to store persistent player data. If you’re not familiar with the utility of ScriptableObjects, you can check out another article I wrote here. By storing relevant progress data inside a ScriptableObject, you’ll be able to visualize changes in real time, since these components are assets that you can select in the Project tab and inspect inside the Unity editor. Of course, this will imply that every script that wants to access this data needs to keep a reference to the asset, but that is not much of a hassle. You just have to create a new field to reference the ScriptableObject and it adds the extra perk that you can easily verify which instances in your scene depend on it, without having to read through their code.
It is important to note two things, though:
The first one is that data stored in ScriptableObjects will not be reverted once you exit Play Mode, when testing your game inside the editor. Unlike scene components, which revert to their default state after you stop playing, ScriptableObjects are project assets and therefore do not support that capability. This means that every value changed while running the game in the editor will remain that way after you’re done testing. One solution is to call a method at the start of your game that resets all the persistent data values to the default ones, so you always start playing with fresh, empty progress data.
Another thing to keep in mind is that you should only store variables like integers, floats, booleans and strings (among other relevant custom data types and collections) inside persistent data containers, no matter if they are dedicated classes or ScriptableObjects. You must NEVER store references to game objects here, especially instances that are present in a certain scene, because since scene specific game objects are destroyed when changing scenes, if you try to access those references later on, you will end up getting an error!
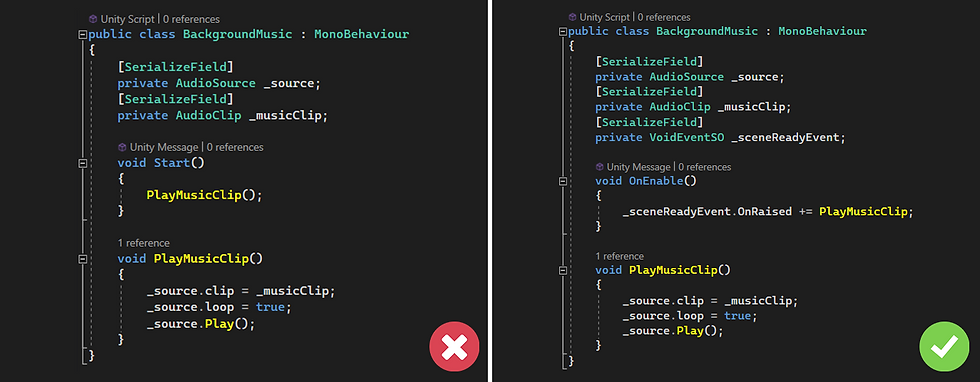
8. Relying heavily on the Awake and Start methods for initialization
Unity has a specific loop that runs on every MonoBehaviour in the scene, which calls default methods that are native to this type of components, like Awake, Start and Update. You have certainly used Awake and Start to get components or set initial values. However, if you are planning to create your own game loop, you should avoid these methods for specific initialization actions.
Let’s say you want a bit more control over the core processes of your game and decide to create a custom Scene Loader component, instead of solely relying on Unity’s default SceneManager methods to handle the task of loading scenes. This way, you can customize the process by displaying a loading screen with a nice background image and some text to tell the player that a new level is being loaded. When the process is done, you might not want to start the new scene right away, but rather wait an extra frame (or even a few seconds) to give a little breathing room for its components to be initialized. But… oh no! While the loading screen is still displaying, the background music in the new scene has already started to play! This is due to the fact that you have a Background Music component that starts playing the song on the Start method, over which you have no control at all. Instead, you would want the song to only begin playing when the loading screen has been hidden and the new scene is finally revealed to the player. But how can you do that?
When you have a custom scene loader that works as described above, you're creating your own game loop, and Unity’s core MonoBehaviour methods are no longer your best friends. Since you want specific scripts to be initialized only when the scene loader gives that order, you can create an event through a ScriptableObject (refer to this article for more information) and have every interested component in the new scene listen to it. Then, once the scene loader raises the event, all listeners will instantly respond accordingly by calling the subscribed initialization method.
If you opt to go this way, note that it requires some meticulous planning, and you must understand a bit of order of execution in Unity. Since event subscription is commonly handled through OnEnable, you cannot have the scene loader raise the event as soon as the new scene is loaded, because that will happen prior to that method being called in the new scene, and no one will respond. Instead, you want to give a head start to all components in the scene for allowing OnEnable to be called first, so when the event is finally raised they can respond.
This is easily manageable by using coroutines. Since the most common scene loading processes are handled asynchronously – to avoid blocking the main thread while loading – you can yield the coroutine execution for one frame with yield return new WaitForEndOfFrame( ) after the loading process finishes, and then raise the event.
I hope you can find these eight suggestions useful and are able to adapt them for your future projects. If you’re just getting started and have read through with the purpose of staying informed, remember that you can always follow the related links I’ve provided to learn more about some of the topics that are covered here.
In the meantime, happy programming! 🤓
Related Links:

Comentários